Monday, December 31, 2012

Top Posts - 2012 in Review

2012 is coming to a close and 2013 is right on it's tail. There's no "winding down" at this House and Yard. The project list is still just as long and the calendar isn't going to get a break. But, that's pretty much how we like it around here.

I thought it would be fun pull together a list of the top ten posts of 2012 and see what people seemed to enjoy reading the most. We'll start with number 10 and work our way up to the top.


 #10 - Painted Nightstand - This was my first try at painted furniture and chalkpaint all in one project. My little raspberry nightstand still makes me smile.

#9 - Mustache Bash Baby Shower - We had a great time celebrating in anticipation of our newest grandson.


#8 - Sunroom Project - This is one of a few updates on the sunroom project. You can see more here, here, and here.


#7 - Kitchen Corner Reveal - I am happy to report that my pretty and organized kitchen corner has stayed relatively tidy - with regular maintenance, of course.


#6 - Showers of Blessing Baby Nursery - This was a fun project using a little bit of paint, glue, some pretty paper and a wall decal.


#5 - Bookcases Revealed - A bit of paint and a few pieces of trim dressed up these ordinary shelves.
#4 - Amazing Kitchen Update - The kitchen is still a work in progress, but in May I finished the paint and backsplash.
#3 - 31 Days of Order Series - This page contains the list of all the posts I wrote in October about bringing order to our lives. This is also still a work in progress. ;-) 
#2 - Chocolate Marshmallow Cake - Absolutely the best cooking mishap ever! How can you go wrong with chocolate cake AND marshmallows?! Right. You can't.
#1 - Miracles Still Happen - The prize for most page views goes to this post about our grandson.
It's been a year of wonder and challenges. The goodness of God has supported us through it all. I have enjoyed the process of projects, writing, and interacting with this online community and hope you'll continue to stop by when you get the chance. Thanks for reading.

Did you have a favorite post? Were you inspired to try something new? How did it go?


Saturday, December 29, 2012

December In A Nutshell

I had such aspirations for December....

Oh well, let's not dwell on it, okay? Here's a few little updates.

Early in the month I visited my mom and we found ourselves in Warsaw, MO. Ohhhh - the shops, the food, the small town sights, the sunset! Lovely!

Isn't this a stunning painted lady?


I have a faint memory of driving over this swinging bridge while on a family trip to the Ozarks when I was a little girl.


This side table begged to come home with me. At only six bucks,  how could I say no? It just needs a bit of love!

This was the view Mom and I enjoyed at the end of our visit to Warsaw....


Sometimes -
no 
words 
are 
needed....


Here's my first try at chalkboard art on my newly installed magnetic chalkboard in the kitchen. I figured I better get a picture of it quick before I erase it for a New Year's message.


The sunroom has carpet!! Yea - it's like a real room now! 

Not only that, but the first snow of the season came the same day!

Christmas was family-full and happy.


 Best wishes to you and yours!

Tuesday, December 4, 2012

Custom Pantry 3

Alrighty! Last week I showed you the progress on my new pantry and it looked like this....


Remember how I promised to show you my big idea for inside the panels? Magnetic chalkboards!

After doing the research I decided against the magnetic paint offered by a big name paint. The reviews kind of made me nervous; there weren't enough happy reviewers.

Not knowing exactly what I would find, I headed to Lowe's for sheet metal and chalkboard paint. I found a couple knowledgeable staff people and came home with my supplies: 4 squares of sheet metal, double-stick mounting tape, and chalkboard paint.


I had already measured the panels, but did it again just to be sure, fixed myself a mocha, turned on the Christmas music, then got to work.


The metal was easy to cut using tin snips. I had to roll the unwanted piece up and away from the panel in order to cut all the way up.


Probably would have been a good idea to wear gloves.


After cutting all the panels I moved outdoors to smooth the edges. I did this with a small, handheld metal file. I also tapped lightly along the edges with a hammer to flatten those areas that became notched from the snips.


Back inside and time to paint. The paint guy at Lowe's recommend that I prime the metal before using the chalkboard paint, which I did. Then, I applied three coats of chalkboard paint. The paint dried quickly, so this took hardly any time at all. Truthfully, it was fully covered after two coats, but I thought three might last longer if we were going to do a lot of writing and erasing.


When the paint was fully dry, it was time to attach the panels to the pantry. I elected to use double-stick mounting tape rather than glue in case I didn't want the panels on my pantry forever-and-ever-amen. This way I can remove them fairly easily if I decide to do so.

The double-stick mounting tape went on the wood first and after revealing the sticky side, c-a-r-e-f-u-l-l-y I pressed the painted metal panel to the pantry starting at the bottom and working my way up.

One of my panels went on alittle cockeyed for some reason and I had quite a time pulling it off for repositioning. The metal is thin, bending easily and the tape is super sticky, so I ended up with a slight bump. If you try this, make certain of your position before pressing to attach the panel.


On this side, I only used the metal panels in the middle section. I applied the chalkboard paint directly to the primed wood of the lower sections.

I like the contrast of the black paint and the red cabinet.


Still to be done to call this project finished are handles for the large pull-out shelves and some trim. Guess I'll have to write another update!

Custom Pantry 1
Custom Pantry 2

*  *  *  *  *  *  *  *  *

And now for this commercial message.... If you like my pantry and need some cabinets, let me know. My son-in-law, Adam, is in the custom cabinet making business and would be glad to talk to you about your kitchen cabinet, bathroom vanity, and/or furniture needs.

*  *  *  *  *  *  *  *  *

Thank you for stopping by A House and Yard!

Sunday, November 25, 2012

Custom Pantry 2

Here is a little teaser update on the pantry project. 

See the first part here

I used the leftover product from my first round of cabinet refinishing - Rust-oleum Cabinet Transformations in Cabernet. The only difference was I needed to prime the pantry first since it was raw wood. It's a perfect color match to the cabinets I finished last year!


All surfaces are painted, glazed, and protected.


Oh - why are there still white panels on this side and splotchy on the other? I am so glad you asked! But, I'm not going to tell you. Although I will show you this....


 Any guesses as to what's up my sleeve? I suppose you'll just have to come back for another update.

I hope you and yours had a wonderfully blessed Thanksgiving holiday.

We had a houseful and enjoyed the most excellent weather.

I think this face pretty much sums up the joy of the day!

See you again soon! Thanks for stopping by.

Thursday, November 22, 2012

Happy Thanksgiving!

Oh yes, make no mistake. I am giving thanks this day to God
for all He has so richly provided in our lives!

I am also thankful for Looney Tunes...
Enjoy!


Wednesday, November 21, 2012

Kitchen Update: Custom Pantry

Happy Thanksgiving, Everyone! Today I've been cooking and getting ready for tomorrow's Thanksgiving family get-together. Weather forecast is fabulous, so the day will certainly include a fair amount of football throwing and basketball shooting. Personally, I like to go for the mid-afternoon walk so I can have another slice of pie.

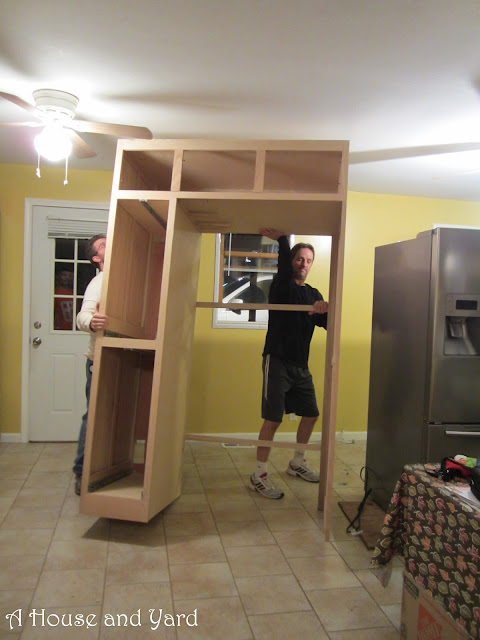
The big news, though? There is a beautiful piece of cabinetry in my kitchen and I have another project to share with you. My son-in-law, Adam, built a pantry for us and installed it a couple nights ago. 

Here is where it belongs and what it looked like before installation.


 At dusk, the guys carefully lifted it and....

carried it on inside.

They stood it up and maneuvered it into place.

And here it stands!


There are pull out shelves on the side,....

...as well as loads of storage space on top.

Wasn't it a great idea for my daughter to marry a talented cabinet builder? 

I will finish it using the same product I used on the existing cabinets. In case you missed that saga, read about it here. I anticipate having a much smoother time with this project and have already tested the finish on a couple squares of scrap lumber from the pantry project. 

While so many of you are out and about shopping this weekend - or napping to recover from your shopping - I will be finishing the pantry. Watch for the update next week!

Praise the LORD! 
Give thanks to the LORD, for he is good! 
His faithful love endures forever.
Psalm 106:1 NLT